Sunday, February 26, 2012

Crock-pot Rice Pudding


Oh- comfort food!  I love anything pudding and anything crock-pot, so together... a beautiful marriage for me!  I remembered making a really big batch of rice pudding in the crock-pot several years back and I just loved it- so I returned to the same book hunting for the recipe, but I don't think I found it.  It was still a good batch though- I kind of liked the lemon flavor (probably in part because I think some of my unusual spices and extracts get lonely, so I love an excuse to dust them off) and how could adding cream not be a good idea?!  The texture was a little different- the rice might have need a bit more time, but still tasty and it sure smelled good while it was cooking!

Mama's Rice Pudding (From Fit-it and Forget-it Cookbook)
1/2 cup white rice uncooked
1/2 cup sugar
1 tsp vanilla
1 tsp lemon extract
1 cup plus 2 T milk
1 tsp butter
2 eggs beaten
1 tsp cinnamon
1/2 cup raisins
1 cup whipping cream
nutmeg to taste

1. Combine all ingredients except whipping cream and nutmeg in slow cooker.  Stir well.
2. Cover pot. Cook on Low 6-7 hours, until rice is tender and milk absorbed.  Be sure to stir every 2 hours during cooking.
3. Pour into bowl.  Cover with plastic wrap and chill.
4.  Before serving, fold in whipped cream and sprinkle with nutmeg.
Posted by Picasa

Friday, February 24, 2012

Chinese Turkey Vegetable Casserole Recipe

Have I mentioned that I LOVE my little chest freezer?  Well, I do.  It makes great things happen--like buying a big old turkey around Thanksgiving time for about .25 a pound and freezing it until now.  We enjoyed a delightful Thanksgiving dinner in February.  It was wonderful, and so was all the meat that I got to freeze.  I've made some yummy soups, sandwiches, and this casserole.  I thought it was pretty good.  I did think it made a HUGE batch.  Even as good as it was, we were getting tired of the left-overs, so I would suggest either halving the recipe or freezing half.

Chinese Turkey Vegetable Casserole (about.com)
Prep Time: 10 minutes
Cook Time: 1 hour
Total Time: 1 hour, 10 minutes

Ingredients:
1 can (1 pound) French-cut string beans, drained
1 can (1 pound) Chinese mixed vegetables, drained
1 can (8-1/2 ounces) water chestnuts, sliced and drained
1 can (8 ounces) sliced mushrooms, drained
1 small onion, chopped
1 cup grated Cheddar cheese
4 cups cubed cooked turkey (or chicken)
1 can (10-3/4 ounces) cream of mushroom soup
1 ounce sherry (I actually used soy sauce- I know that not very similar, but it seem to give the "chinese" flavor that it needed)
1 cup milk (It was pretty runny- I think I would half this or add a half cup uncooked rice to give it a firmer texture.)
1 can (3 ounces) french-fried onions

Preparation:
Alternate layers of vegetables, cheese, and chicken in greased 9 x 13-inch casserole. Combine soup, soy sauce, and milk. Pour over casserole. Cover loosely with foil. Bake at 350 degrees F. for 40 minutes. Remove foil; sprinkle onion rings on top. Bake 20 minutes longer. Yield: 6 to 8 servings
Posted by Picasa

Friday, February 17, 2012

Oven Baked Salmon

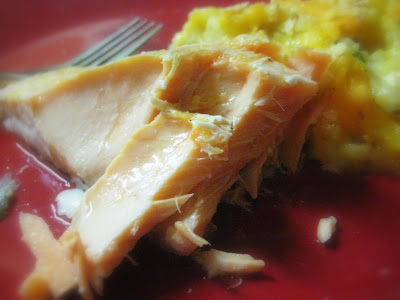
Ok Mom.  Here you go- this one's for you and your Dukan Diet.  I do have some occasional protein. :)  Let me just say I LOVE salmon.  And to me, simple is better--just baked up like this beats any fancy Cajun rub or sweet and sour or whatever people do.  I tried a teryaki version once and I was quite disappointed.  Just stick with the basics and sometimes you just can't go wrong-- at least with salmon.  I actually got this one fresh too, and there is such a difference in the taste!  It was just a treat, so I didn't want to mess it up by over cooking it.  Here are some good basic instructions.  (Wish you were around for a serving mom!)

Oven Baked Salmon (foodnetwork.com)
12 ounce salmon fillet, cut into 4 pieces
Coarse-grained salt
Freshly ground black pepper
(I also sprinkled mine with lemon-pepper seasoning- perfect for fish! And just a bit a lemon juice.)

Preheat the oven to 450 degrees F.
Season salmon with salt and pepper. Place salmon, skin side down, on a non-stick baking sheet or in a non-stick pan with an oven-proof handle. Bake until salmon is cooked through, about 12 to 15 minutes.
SERVES: 4
Calories: 177
Total Fat: 11 grams
Saturated Fat: 2.5 grams
Protein: 17 grams
Total carbohydrates: 0 grams
Sugar: 0 grams
Fiber: 0 grams
Cholesterol: 47 milligrams
Sodium: 170 milligrams
Posted by Picasa

Monday, February 13, 2012

For the LOVE! German Chocolate Thumbprint Cookies


HAPPY HEART DAY!!!  It would be a crime to break with a tradition: Chocolate on Valentines Day.  German Chocolate cake is my hubby's favorite, so of course these cookies caught my eye.  Unfortunately, this one is going down as a "mishap".  I thought the icing was quite tasty, but a lot of work to make, so if I did it again (which I probably won't) I would definitely just buy some pre-made icing.  PLUS these little babies did not hold together right.  Is there any thing more exasperating than seeing a picture off a recipe and not recognizing it your own "version"?  Theirs were all flat and mine just stayed in little crumbly balls--actually making a "thumbprint" was a joke because they just fell apart.  I don't know what I did wrong, but I finally added a little bit of milk and they stayed together pretty well.  They did, however, taste pretty good... which in my opinion is #1 priority.  (This is second to "labor involved" and this one was high labor.  Don't be deceived by "cake mix".  I have a hard time when you have to refrigerate cookie dough and all that--but I'll have you know that I didn't skip that step.) So consider carefully before before proceeding... it might just be a better idea to buy a candy bar or a box of chocolates. :)  I'm just saying.  But here it is anyway.

German Chocolate Thumbprint Cookies (Taste of Home)
1 cup sugar
1 cup evaporated milk
1/2 cup butter, cubed
3 egg yolks
1-1/2 cups flaked coconut
1-1/2 cups chopped pecans
1 teaspoon vanilla extract
1 package (18-1/4 ounces) German chocolate cake mix
1/2 cup all-purpose flour
1/3 cup butter, melted

In a large heavy saucepan, combine the sugar, milk, butter and egg yolks. Cook and stir over medium-low heat until mixture is thickened and coats the back of a spoon. Remove from the heat. Stir in the coconut, pecans and vanilla. Set aside 1-1/4 cups for topping.
In a large bowl, combine the cake mix, flour, melted butter and remaining coconut mixture. Cover and refrigerate for at least 1 hour.
Shape dough into 1-in. balls. Place 2 in. apart on greased baking sheets. Using the end of a wooden spoon handle, make an indentation in the center of each cookie. Fill each cookie with a teaspoonful of reserved topping.
Bake at 350° for 10-12 minutes or until set. Let stand for 2 minutes before removing to wire racks to cool. Store in an airtight container. Yield: 5 dozen.
Nutritional Facts1 cookie equals 113 calories, 6 g fat (3 g saturated fat), 18 mg cholesterol, 93 mg sodium, 13 g carbohydrate, trace fiber, 1 g protein.
Posted by Picasa

Friday, February 10, 2012

Spiced Asian Pears with Sweetened Ricotta


Where has ricotta cheese been all my life?  I feel like I've been living (or at least eating) in a closet!  I'm in love!  Here I thought it was only good for a hearty lasagna, but just a tiny bit a sugar is all it needs and it is THE BEST TREAT ever! (Pretty high in protein and can be low in fat too.)  Something about the texture--I think it goes back to that a fore mentioned love I have of all thing soft, sweet, and mushy, and it fits into that category. Then, kick it up a notch with this little concoction I came up with, and dare I say this is my new favorite dessert? Yes.  I dare. :)

*Lyd's Tip:  Just thought I would mention that this is a great way to use up old apples- it breathes new life into them.  No one but you will know that they were getting a bit old and wrinkly. :)  You should know that I used some Asian pears I picked up at the end of the farmer's market in October- but don't panic- I am about 2 months behind on this post.  They weren't that far gone. :)  However, they did sit on my counter for a VERY long time, haunting me.  If only I had known that this was what they were trying to tell me they wanted to be, it would have happened a lot sooner.

Spiced Asian Pears with Sweetened Ricotta (By Lyd)
Ricotta Mixture:
2 cups ricotta cheese
2 T sugar (more or less to taste)
Tiny drop of Almond or vanilla extract

Pear Mixture:
About 3-4 Asian Pears, peeled and thinly sliced (*Please note that APPLES WORK GREAT, don't feel like you have to be so exotic... I just happened to have some Asian pears as I was experimenting and I love the crunchy texture- I dislike the bitter, woody peel though.  If you do apples, you could probably just leave the peel on- I would anyway.)
1-2 T butter
1-2 T sugar
1 tsp cinnamon
1/4 tsp nutmeg
1/8 tsp cloves
1 tsp lemon juice

Stir together ricotta mixture ingredients until incorporated; set aside.  In a large frying/sauce pan heat butter on medium heat.  When butter is melted, put in Asian pears.  Stir frequently, mixing in sugar and spices. Add lemon juice and continue heating until pears are cooked, but still maintain some crispness. (About 10 minutes, stirring frequently.  Add a little water or reduce heat if cooking too quickly.  You can also "put a Lyd on it" if you want it too cook faster. (I love slipping that in there. :)
Posted by Picasa

Wednesday, February 8, 2012

Yeast Dispenser

I love little things that just make life easier. I came across this post on Jennifer's Craft Patch site (which is awesome by the way) and made my life simpler in seconds. I buy the bigger packages of yeast, and store them in my fridge in a glass jar, but this makes pouring it a lot easier, so I thought I would pass on the idea- just cut out the top of an old salt container and trace it to fit the jar. Happy baking!
Posted by Picasa

Wednesday, February 1, 2012

Chocolate Snowballs

A couple weeks ago, we got almost two feet of snow in one day.  It was wonderful!  I love snow days!  They closed school and all the kids spend the day building forts and snowmen.  It was that wet kind of snow, perfect for making snowballs... chocolate covered snowballs, that is. :)  This was a fun recipe I tried.  They were tasty, but a little dry--and too time consuming to be a "regular" around here.  I think there might be better versions out there, but I thought it was a fun concept, and it makes for a fun "snow day!"

Chocolate Snowballs (From Christmas at Home: Delicious Desserts)
1 1/4 cups butter
2/3 cup white sugar
1 teaspoon vanilla extract
2 cups all-purpose flour
1/8 teaspoon salt
1/2 cup unsweetened cocoa powder
2 cups chopped pecans
1/2 cup confectioners' sugar for decoration

In a medium bowl, cream butter and sugar until light and fluffy. Stir in the vanilla. Sift together the flour, salt, and cocoa; stir into the creamed mixture. Mix in the pecans until well blended. Cover, and chill for at least 2 hours.
Preheat oven to 350 degrees F (175 degrees C). Roll chilled dough into 1 inch balls. Place on ungreased cookie sheets about 2 inches apart.
Bake for 20 minutes in preheated oven. Roll in confectioners' sugar when cooled.
Posted by Picasa